After logging in as the admin you click on the Publisher List link from the top right drop-down menu.publist.jpg 6.58 KBFrom the Publisher Approval Pane, you can approve or reject new publishers or view the websites of existing publishers.aproverejectpubs.jpg 19.15 KB Approve Demand Customers
Log in as the Admin to Demand Customers
After logging in as the admin you click on the "Customer List" link from the menu.customerimage.jpg 8.39 KB
From the Demand Customer Approval Pane, you can approve or reject new publishers or view the websites of existing demand customers.
Note: When you approve a demand customer, you are giving them their own private exchange under your main system. demandcustomerlistimage .jpg 20.25 KB
Logging in as a Publisher
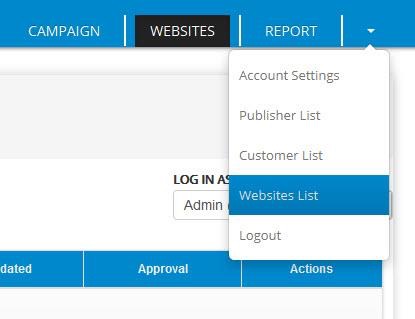
To login as a publisher in order to edit, or approve a publisher's websites and ad zones, first log in as the admin, and click the websites tab. The publisher must be approved in order for them to show up in the list.pubadminusers.jpg 13.78 KB
Logging in as a Demand Customer
To login as a demand customer in order to edit, or approve a demand customer's preview version changes, first log in as the admin, and click the campaign tab. The demand customer must be approved in order for them to show up in the list.demanduserlogin.jpg 31.85 KB
Approving Publisher Websites
There are two different ways to approve publisher websites. Note that a publisher can not sell CPM from their zones when their website is not in the approved state, nor can they add new ad zones.The first way to approve publisher websites is to log in as the publisher, then to click either the approve or reject link for the new website. You can always approve a rejected site later.Approving Publisher Websites .jpg 21.34 KB
The second way to approve a publisher website is to stay logged in as the Admin then to click the account menu and select Websites Listapprove a publisher website.jpg 14.72 KB
Now you can batch approve or reject publisher websites using check boxesbatch approve.jpg 15.52 KB
Approving Publisher Ad Zones
Approve publisher ad zones. Note that a publisher can not sell CPM from their zones when their ad zone is not in the approved state.
The way to approve publisher ad zones is to log in as the publisher, then to click either the approve or reject link for the new ad zone. You can always approve a rejected an ad zone later.approve publisher ad zones.jpg 20.33 KB
Set up an Insertion Order via the Demand Dashboard
Login as the Demand Customer and click on "Create Insertion Order" from the private-exchange demand customer dashboard pane.Create Insertion Order.jpg 54.99 KB
There are 3 types of inventory available for an insertion order:
They have default access to inventory from their own set of publishers. No super admin approval is needed for insertion orders. Demand customers can approve their own insertion orders with this inventory.
They have selected access to Platform Connection inventory. After completing a credit application the super admin can enable a demand customer to bid on inventory from the Platform Connection inventory chooser
1. Q. What is Platform Connection Inventory? A: Platform Connection is the inventory from other demand customers' private exchange publishers. Private exchange publishers' inventory is only available to the demand customer who added the publishers by default. When the demand customer ticks the "Enable Platform Exchange" box under the domain website options in one of their publishers, it allows their inventory to show up in the "Platform Exchange" inventory chooser of other demand customers using the platform.
3. They have selected access to SSP inventory. After completing a credit application the super admin can enable a demand customer to bid on inventory from the SSP inventory chooser
1. Q:What is SSP Inventory? A: SSP inventory comes from buy side OpenRTB partners which are streaming inventory bid requests to the ____ Exchange platform via OpenRTB bid requests.
A super admin may select any of these to add to an insertion order, but a demand customer cannot. They must explicitly be approved to add Platform Connection and SSP inventory to their insertion order.
NOTE THAT: Private Exchange, Platform Connection, and SSP inventory chosen for an insertion order are not used in the bidding process. Inventory items chosen in an insertion order are only used as defaults for subsequent line items. Only the inventory chosen for line items is used to fill publisher inventory requests of all kinds.
Setting up line items for an insertion order
Login as the Demand Customer, choose an existing insertion order and click on "Create Line Item" from the private-exchange demand customer dashboard pane.Create Line Item.jpg 42.27 KB After doing this you must approve this preview revision of the Demand Customer's ad campaign account. You can click the top left logo to return to the ad campaign list, then click approve changes to make the changes live.aprove staging.jpg 68.54 KB
Enable a website for Platform Connection via the Publisher DashboardLogin as the Publisher and click on "Edit Domain" from the main publisher dashboard pane. Then check the "Platform Connection" box and click on the update domain button.Edit Domain.jpg 18.6 KBSetting the CPM Markup Rate on Publishers
What is the Publisher mark-up rate? Publishers that sign up to your Ad Server do so with the intention of making money from the ad space on their websites. In return they must pay a fee. That fee is a percentage of the profits from their ad sales. That is the publisher mark-up rate. There are two different ways to set the publisher mark-up rate in
The first way you can assign a mark-up rate is to assign a default mark-up rate that only applies to a publisher. To assign this default mark-up rate, sign in as the publisher from the Admin dashboard, and change the rate in the box above the publisher website list and click on the Change Publisher Markup button.Publisher mark-up rate.jpg 25.75 KB
The second way you can assign a mark-up rate is to assign a default mark-up rate that only applies to a publisher's website. To assign this default mark-up rate, sign in as the publisher from the Admin dashboard, and change the rate in the box in the row for the website and click on the Update Markup button.mark-up rate.jpg 28.7 KB
Setting the CPM Markup Rate on Demand Customers
What is the Demand Customer mark-up rate? Demand Customers that sign up to your Ad Server do so with the intention of spending money to drive visitors to their brand websites or those of their customers in the case of digital marketing firms. In return they must pay a fee. That fee is a percentage of the margin from their ad spend to your partners. That is the demand customer mark-up rate.
There are two different ways to set the demand customer mark-up rate in .
The first way you can assign a mark-up rate is to assign a default mark-up rate that only applies to a demand customer. To assign this website specific mark-up rate, sign in as the demand customer from the Admin dashboard, and change the rate in the box above the demand customer ad campaign list and click on the Change User Markup button.default markup.jpg 25.58 KB
The second way you can assign a mark-up rate is to assign a default mark-up rate that only applies to a demand customer's ad campaign. To assign this default ad campaign specific mark-up rate, sign in as the demand customer from the Admin dashboard, and change the rate in the box in the row for the ad campaign and click on the Update Markup button.setmarkupeach.jpg 27.35 KB
Approving Demand Customers for different inventory types
Select the customer list from the top right menuThe inventory status of the customers is listed in the next to last column titled credit approvals custlist.jpg 8.39 KBcreditapp.jpg 20.1 KBFrom the customer credit screen you can take one of 3 actions:
You can click a link to email the media buying customer a credit application to fill out
You can enable Platform Connection inventory to be select-able for that customer
You can enable SSP OpenRTB incoming programmatic inventory channels to be select-able for that customer in their inventory choosermanagecredit.jpg 35.31 KB
Admin Reporting Guide
Creating standard reports.
First log in as the admin and click on the reporting tab.REPORTS1.jpg 9.97 KB
Now view the total impressions by Ad Zone and by the Publisher. The total impressions are shown in an hourly format.
Notice that you can view the latest impressions which are shown by default, or you can view impressions for a specific date range by using the calendar date range tool then clicking the Show buttonREPORTS3.jpg 15.3 KBNow view the total impressions by TLD and by the Demand User and TLD. The total impressions are shown in an hourly format.Notice that you can view the latest impressions which are shown by default, or you can view impressions for a specific date range by using the calendar date range tool then clicking the Show buttonREPORTS2.jpg 18.22 KBwe can also integrate Analytics, Tag Managers, DMP take a look at these add ons